Mazda3 Forums banner
21 - 38 of 38 Posts
I'd like to thank you guys for the useful information and pics here. That sufficed to let me adjust the factory HIDs on my '09 BK - vertical aim only, which was set significantly low.

As I didn't want to remove the headlights from the car, what best worked for me is a 1/4" ratchet with a 10 mm socket (car's right-side headlight) and a Phillips socket (car's left-side headlight). No plastic covers, just a bare bolt/nut that can be turned with the aforementioned sockets. Now I can see somewhat further than 5 m in front of the car. Test drove it yesterday, traffic on the opposite direction never flashed their lights at me, so I assume my lights are not set too high. Also the beam from inside the car seems to project just parallel to the road when driving on a flat, well paved surface.

Another way to give some clues if the lights are aimed too low/high is to drive (carefully!) towards a wall in a garage or so aprox. from 15 to 3 meters and look at the projected light on the wall. If the 'elbow' junction climbs up as you approach the wall, your lights are set too low. If the projection goes down, they are set too high.
 
The guide I've always used is great, but you'll have to Google "Daniel Stern lighting", there is a great link for aiming.
I'd have inserted the hyperlink directly but that is apparently too exclusive for my thread post number on this site.

That being said, I'm not sure how it translates exactly to you guys who are installing HID kits while still using housings that have halogen lenses, but I thought I'd share anyway.
 
Just like this! :lol:

HEADLIGHT AIMING


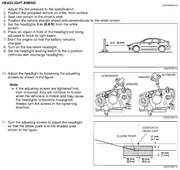
Adjust the tire pressure to the specification.
Position the unloaded vehicle on a flat, level surface.
Seat one person in the driver's seat.
Position the vehicle straight ahead and perpendicular to the white screen.


Image


Set the headlights 3 m {9.8 ft} from the white screen.
Place an object in front of the headlight not being adjusted to block its light beam.
Start the engine so that the battery remains charged.
Turn on the low-beam headlight.
Set the headlight leveling switch to the 0 position. (Vehicles with discharge headlights)


Image


Adjust the headlight by loosening the adjusting screws as shown in the figure. NOTE: If the adjusting screws are tightened first, then loosened, they will continue to loosen when the vehicle is in motion and may cause the headlights to become misaligned. Always turn the screws in the tightening direction.

Image


Turn the adjusting screws to adjust the headlight so that the elbow point is in the shaded area shown in the figure.
I am resurrecting an old thread & post for two reasons:
1) The instructions in the manual are conflicting
2) I can't figure out how to adjust these things while they're mounted in the vehicle, let alone when they're uninstalled.

First, the instructions:


The instructions say to loosen the adjusting screws, then it says not to loosen them and then tighten them. Always tighten them. So which is it?

Second, which screws???


Here is a headlamp I removed from the vehicle. There are white caps on what I suspect are the adjusting screws. The plastic cap will not come off unless a screwdriver is jammed in a slot and then it's broken.

I would appreciate help from someone who has done this.
 
owns 2006 Mazda 3 s
VW&D,

I did the aiming a few months ago and it was a pain to figure out. After a long while I realized I was doing it the hard way. My two headlights have different caps on each headlight, go figure, but you have to get them off. Once off I thought you needed to stick a screw driver in the back basically perpendicular to the headlight. So hard to adjust. That is the incorrect way. You stick a phillips screw driver vertically into the adjustment "knob", down the adjustment slots, with the headlight in the car.

The picture shows two screwdrivers in the slots (or adjustment channels) where you can simply turn them. Note that the caps are still on for this pic. One knob adjusts side to side and the other up-down. In actuality, it isn't a perfect side-to-side or up-down if I remember correctly. It's kind of diagonal. Eventually I got it to work. Please note that your high beam adjustment is not done separately. However you have your low beams adjusted will impact your high beams.
 

Attachments

VW&D,

I did the aiming a few months ago and it was a pain to figure out. After a long while I realized I was doing it the hard way. My two headlights have different caps on each headlight, go figure, but you have to get them off. Once off I thought you needed to stick a screw driver in the back basically perpendicular to the headlight. So hard to adjust. That is the incorrect way. You stick a phillips screw driver vertically into the adjustment "knob", down the adjustment slots, with the headlight in the car.

The picture shows two screwdrivers in the slots (or adjustment channels) where you can simply turn them. Note that the caps are still on for this pic. One knob adjusts side to side and the other up-down. In actuality, it isn't a perfect side-to-side or up-down if I remember correctly. It's kind of diagonal. Eventually I got it to work. Please note that your high beam adjustment is not done separately. However you have your low beams adjusted will impact your high beams.
Sorry, but I'm still lost. I'm looking at the driver's side headlight I removed from the car and I'm not seeing how this works. Also, the instructions from the repair manual don't make sense (see my earlier post where I note the conflicting language).


What is the purpose of the one screw/bolt head that is exposed?
 
owns 2006 Mazda 3 s
OK, with my two headlights with different caps on the adjustment screws, some caps were re-useable (take em off, put em back on) and others seems to almost be the kind you had to break off and not reuse. The two white caps you have are the ones that need to come off. Pry them off from the side - i.e. put a screwdriver between the headlight black plastic and the cap while plastic.

In this picture I show the two channels where you stick the phillips screwdrivers once the caps are off. Red arrows. With the one blue arrow I show how you would adjust the brownish looking knob. This one has no cap and is ready to adjust if you put a screwdriver in the adjustment slot. But I don't know what this knob is for.

Yes, the instructions are really confusing. Obviously it's a bad translation from Japanese to English. Just adjust both knobs to aim the headlight. Park in your driveway in front of your garage door with your lights on when it is dark outside. You'll be able to see the difference in the two beams and there is a little notch in each beam at the top line of light that you use to tell you how centered each beam is. I realize that is a bad explanation, but it was translated from my brain into English.

Once I figure out how to turn the adjustment knobs I just started playing with them and was able to figure out what was wrong and what was right. Then I took a test drive and saw how good/bad the lights were and tried it again. I was just trying to make the lights the same since one was really really off. I didn't realize it was off until I drove the car in fog and saw that one headlight was pointing up to the sky and off to the side of the road.

I ended up taking out both headlights, reseating the bulbs and putting that STUPID retaining clip back in correctly. Once the bulbs were seated correctly I could re-aim the headlight with pretty good success.
 

Attachments

OK, with my two headlights with different caps on the adjustment screws, some caps were re-useable (take em off, put em back on) and others seems to almost be the kind you had to break off and not reuse. The two white caps you have are the ones that need to come off. Pry them off from the side - i.e. put a screwdriver between the headlight black plastic and the cap while plastic.

In this picture I show the two channels where you stick the phillips screwdrivers once the caps are off. Red arrows. With the one blue arrow I show how you would adjust the brownish looking knob. This one has no cap and is ready to adjust if you put a screwdriver in the adjustment slot. But I don't know what this knob is for.

Yes, the instructions are really confusing. Obviously it's a bad translation from Japanese to English. Just adjust both knobs to aim the headlight. Park in your driveway in front of your garage door with your lights on when it is dark outside. You'll be able to see the difference in the two beams and there is a little notch in each beam at the top line of light that you use to tell you how centered each beam is. I realize that is a bad explanation, but it was translated from my brain into English.

Once I figure out how to turn the adjustment knobs I just started playing with them and was able to figure out what was wrong and what was right. Then I took a test drive and saw how good/bad the lights were and tried it again. I was just trying to make the lights the same since one was really really off. I didn't realize it was off until I drove the car in fog and saw that one headlight was pointing up to the sky and off to the side of the road.

I ended up taking out both headlights, reseating the bulbs and putting that STUPID retaining clip back in correctly. Once the bulbs were seated correctly I could re-aim the headlight with pretty good success.
OK. I was wondering if the caps need to be removed (or broken off) since I did so on one of the old headlight assys and started turning the screws. Once I get the situation straight with the CV axle on my car (noted in another thread) I'll be able to address aiming the headlights. Unfortunately, I can't use my garage door & driveway for the adjustment because my driveway slopes almost immediately! :laugh: I'll be able to find a nice, level spot where I can do this.

Thank you for the detailed explanation. I will be sure to follow-up when I'm finished.
 
owns 2006 Mazda 3 s
  • Like
Reactions: Mark T
My driveway does the same as yours. So I really couldn't follow the true aiming instructions they gave with all the measurements. I just figured that one of my headlights was pretty good, and the other was really bad. Make bad one like good one on the garage door. Go for drive. Park in driveway again and make another adjustment on both lights. Go for drive.

I got them fairly well centered and they shine down the road a decent amount. It's the only headlight aiming I've ever done and I hope I don't have to do it very often, but my sons lights are starting to fog up and I think we'll replace both of them next year. Likely I'll have to aim those and am not exactly looking forward to it, ha.

I've tried the lens cleaning kits and got the headlights on my old Subaru to look just perfect. Then a year later they looked like crap again. I guess once that protective coating is off you can't stop the oxidation. So now I just buy a high quality replacement headlight from Action Crash. The one I got for my daughters car really did look like an OEM light and it was about $135. Expensive, but way cheaper than OEM.

I hate changing headlight bulbs too. Wow, I'm just in a complaining mood today.
 
Just an update on this thread. I took my MZ3 to Nelson Mazda, in Norman, OK, to have the headlights aimed. The tech was a really nice kid who I spoke with before he did the work. I explained why I had replaced the headlights and that I was baffled by the plastic caps over the screws, because the sedan doesn't have that setup. He said those are for left and right adjustments (which I believe someone stated earlier, in this thread).

Anyway, that one odd, exposed screw, adjusts height. He didn't even charge me for the adjustment, because he said it was quick and easy. When I was showing him some of the work I'd done, I pointed out a bracket that was missing two fasteners. I think someone who previously did work on the car forgot to put them back. He knew their size straight away, and I stated if he had extras and could replace them, great. If not, no big deal (I know techs collect extra screws, nuts, and bolts). He replaced them as well! Oh, and I slipped some cash into his pocket despite his protests and refusals. :D He has a MZ3 sedan he drives every day that he dropped a 2.5L into because the original engine was blown. We had a good time talking cars.
 
owns 2006 Mazda 3 s
  • Like
Reactions: Mark T
VW&D,

I did the aiming a few months ago and it was a pain to figure out. After a long while I realized I was doing it the hard way. My two headlights have different caps on each headlight, go figure, but you have to get them off. Once off I thought you needed to stick a screw driver in the back basically perpendicular to the headlight. So hard to adjust. That is the incorrect way. You stick a phillips screw driver vertically into the adjustment "knob", down the adjustment slots, with the headlight in the car.

The picture shows two screwdrivers in the slots (or adjustment channels) where you can simply turn them. Note that the caps are still on for this pic. One knob adjusts side to side and the other up-down. In actuality, it isn't a perfect side-to-side or up-down if I remember correctly. It's kind of diagonal. Eventually I got it to work. Please note that your high beam adjustment is not done separately. However you have your low beams adjusted will impact your high beams.
 
These are great pictures of what to do...Thank you so much! I was about to pry off or break the white plastic that covers the adjustment screw! Good thing I checked this forum! Hopefully I can adjust them now...
 
VW&D,

I did the aiming a few months ago and it was a pain to figure out. After a long while I realized I was doing it the hard way. My two headlights have different caps on each headlight, go figure, but you have to get them off. Once off I thought you needed to stick a screw driver in the back basically perpendicular to the headlight. So hard to adjust. That is the incorrect way. You stick a phillips screw driver vertically into the adjustment "knob", down the adjustment slots, with the headlight in the car.

The picture shows two screwdrivers in the slots (or adjustment channels) where you can simply turn them. Note that the caps are still on for this pic. One knob adjusts side to side and the other up-down. In actuality, it isn't a perfect side-to-side or up-down if I remember correctly. It's kind of diagonal. Eventually I got it to work. Please note that your high beam adjustment is not done separately. However you have your low beams adjusted will impact your high beams.
These are great pictures of what to do...Thank you so much! I was about to pry off or break the white plastic that covers the adjustment screw! Good thing I checked this forum! Hopefully I can adjust them now...
ok, I did have to pry off the white caps on my 2008 MS3, and will wait till the evening to adjust them...however it looks like the only way to adjust them is to use a 10mm and or philips screw driver.
 
ok, I did have to pry off the white caps on my 2008 MS3, and will wait till the evening to adjust them...however it looks like the only way to adjust them is to use a 10mm and or philips screw driver.
Is this a sedan or a hatchback?
 
owns 2006 Mazda 3 s
21 - 38 of 38 Posts