
This is my work through, and a How-To on swapping a 2.5L into your 2.0/2.3L Mazda3 or 6
I chose to do the 2.5 swap mainly because of the price differences, and the work involved with something other than a direct swap with a 1st gen Mazda 2.3L. This list includes $175 based on LKQ's (eBay) shipping rate.
Mazda 2.3 (04/05)(06-09) - $1375 on average
Ford 2.3 - $725 on average
Mazda 2.5 - $765 on average
Ford 2.5 - $535 on average
So taking that into consideration here is my part breakdown and purchase list. Some of it might not be needed for some of you. I went into this with a do it right the first time mindset.
Engine:
2010 Ford Escape 2.5 w/27k - LKQ (eBay) - $542.98 w/ Shipping
Tuning:
OrangeVirus Tuning Method:
Tactrix Openport 2.0 OBDII Dongle - $171.32
MazdaEdit - $175
OrangeVirus' rate for a custom tune - $99
Parts:
Mazda Clutch Pilot Bearing (YF09-11-303) - $8.91
Mazda Crankshaft Pulley Bolt (LF01-11-406) - $12.44
Mazda Camshaft Washer (LF941242Y) - $9.89
Mazda Timing Cover Seal - (1F2010602) - $10.00
Victor Reinz Main Bearing Gasket (67756) - $33.63
Massive Absolute Precision Cam Timing Tool Set - $29.17
VS50639R1 - Valve Cover Gasket - $14.96
MS97160 - Intake Manifold Gasket - $16.82
MS96901 - Exhaust Manifold Gasket - $16.63
2008Milan 2.5>2.3 Intake Plate - $100
(2.3 to 2.5 engine swap - intake adapter plate - FordFusionClub.com : The #1 Ford Fusion Forum)
31540 - Exhaust Pipe Flange Gasket - $1.60
51516 - Wix Over-sized Oil Filter - $6.91
Castrol 5W-20 Synthetic Oil (5 Quart) - $28.68
Mobil 1 75W-90 Synthetic Transmission Gear Oil (1 Quartx3) - $35.37
Prestone AF2000 Extended Life Antifreeze (Concentrated) - $12.47
Permatex 81160 Hi-Temp Red Gasket Maker - $6.99
Permatex 24200 Blue Thread locker - $4.77
Other (Extras):
EBay Oil Catch Can - $15
GPWerks Balance Shaft Delete Kit - $27.50
Massive RaceSpec EGR Delete System - $31.15
Replacement 3/8 Fuel/Valve Cover Lines - $13.28
DIY Grounding Kit:
8 Gauge Grounding Wire (20ft) - $7.80
8 Gauge Distribution Block - $7.49
8 Gauge Ring Connectors (20) - $8.45
Tan Header Wrap 1/16"X2"X25' - $15.00
BAHNHOF Clutch Kit (EBay) - $87.95
Bahnhof Clutch Disc Bearing Tool Mazda 3 5 Models 2 3L 2 0L | eBay
* Clutch Disc Stage 1
* Bahnhof Release Bearing
* Pilot Bushing
* Alignment Tool
Final Price - $1312.33
Required tools:
Air tools (not needed but highly recommended)
Metric socket set
Metric wrench set
Assortment of socket extensions and adapters
Assortment of Pliers/Cutters/Ect.
Assortment of 1,2,3 Phillips/Robertson/Flathead Screwdrivers
Hammers
(2) Pickle Forks
Prybars and Breaker bars
Engine Hoist
Engine Stand
Torque Wrench
Links:
Mazda3 Workshop Manual
How-To: Mazda/Ford 2.5L Swap
How-To: Mazdaspeed3 Rear Spoiler Install on MZ3 Hatch
How-To: Mazdaspeed3 Transmission Swap
How-To: Mazdaspeed3 Front Sway Bar Install
How-To: Installing an Oil Catch Can
How-To: VICS Removal Guide
How-To: Balance Shaft Delete
*Use my How To in conjunction with the Mazda Workshop Manual and (http://www.mazda3forums.com/61-powertrain-2004-2009-mazda3/647562-04-2-3l-swap-2-5l-successful.html). You should not run into any issues!
This may also be an excellent time to do any suspension maintenance or installs of beefier sway bars.
Step 1: Removal
- Remove your old engine, here's a link to a 6 getting its engine pulled: Mazda 6 and Ford Fusion 2.3L Engine Swap | Happy Wrenching
- Remove your hood
- Remove your engine cover
- Disconnect the 2 harnesses located on the ECU, and the one inside of your fuse box
- Remove battery and its cover
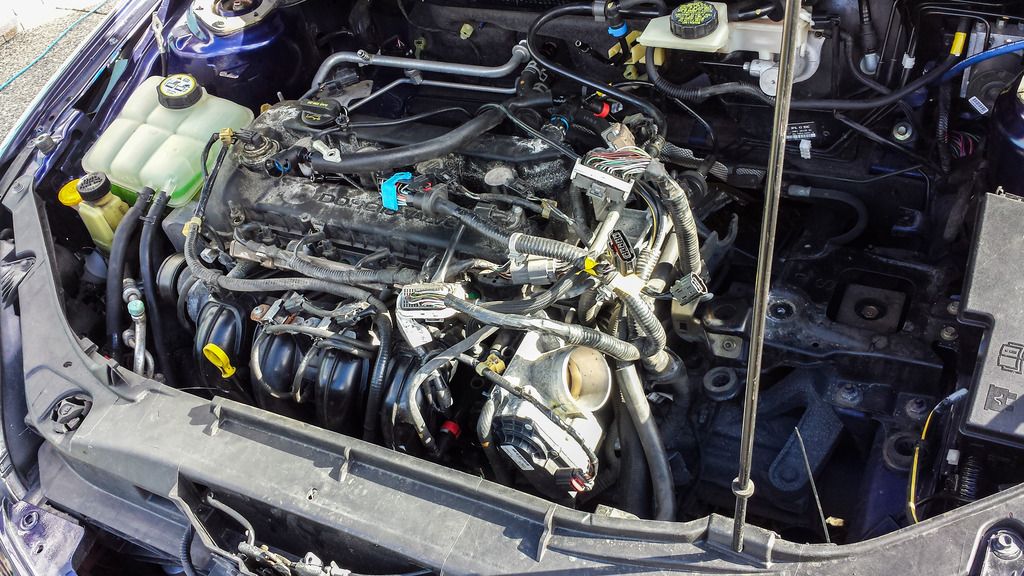
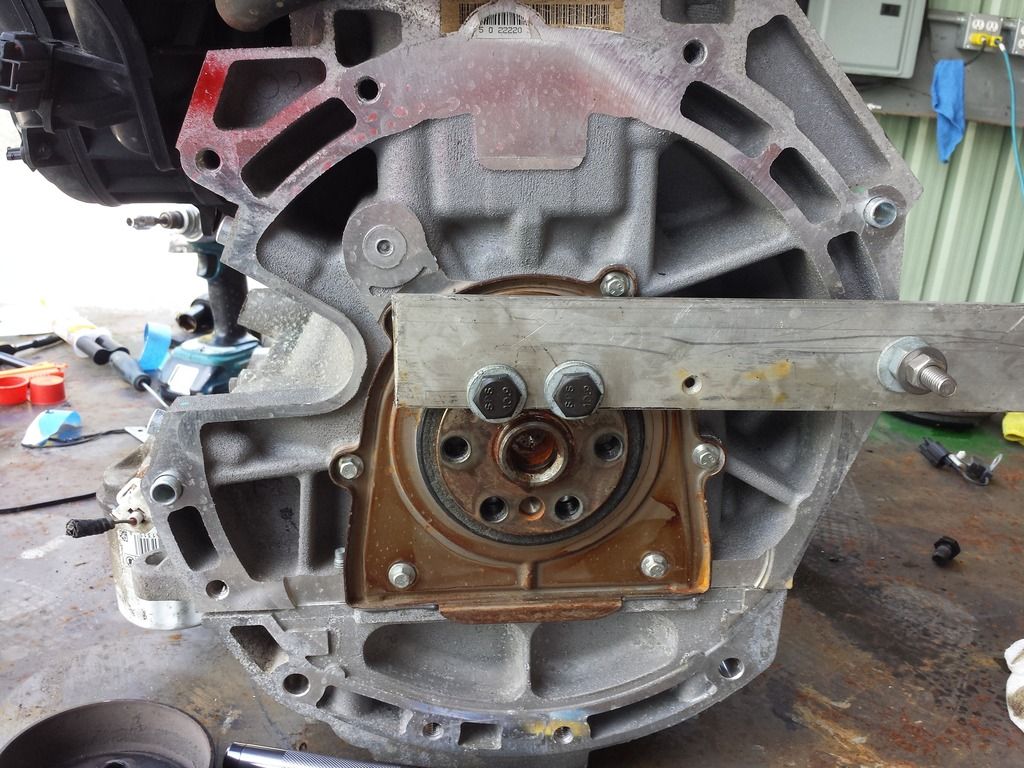
- Remove intake all the way down to the collector below the frame line
you should now have something like this:
- Jack your car up
- Remove your wheels
- Remove all your splash guards (2 fender walls and then the front splash guard)
- Drain your Oil and Transmission fluid
- Remove your axle nuts
- Remove your breaks and zap-strap them to your spring
- Separate both your lower control arm and steering link with 2 pickle forks
- Free your CV shafts from your wheel hub (just pull the hub towards you and the CV shaft should pop free
- Remove your CV Shafts from the transaxle
* Passenger side has a bracket mounted to the engine, 3 bolts to remove here
* Give them a good yank as close to the transmission as possible, the drivers side needed a little more coaxing with a small prybar and wiggle room
- Have a way of containing the differential after you pull the CV Shafts out, or it might slip. I used 2 same sized sockets as placeholders
- Remove your exhaust manifold
* Here I removed the 2 bolts after the 2nd o2 sensor first. They broke on me due to the rust, cut off the stud, and drill them out, and then find yourself some nice stainless hardware so you never have this problem again once it's time for an aftermarket header or catback.
* Move your way on up and disconnect the 2 o2 sensor pigtails on the engine side and let them hang
* Remove the first mounting bracket close to the first catalytic converter
* Remove the hardware holding the manifold to the block
* With the manifold removed from the rest of the exhaust system I was able to push the header as far down to the firewall/cross-member to avoid any conflict with the engine removal process.
- Drain all your coolant and remove coolant lines connected to engine
- Remove your front bumper cover
- Remove your Headlights
- Remove your front crash bar
- Disconnect your fuel line and vacuum line to the master cylinder. Both connections I removed at the firewall.
- Disconnect your clutch slave cylinder and move out of the way
Remove your shifter linkage from the transmission
- Rig up your means of removing the engine
- I unbolted one bolt from the rad support beam just above where the headlight was and that gave me a lot of room for the pull
With the engine supported by the hoist, remove all 3 engine mounts
- Remove your engine slowly, and check for any snags
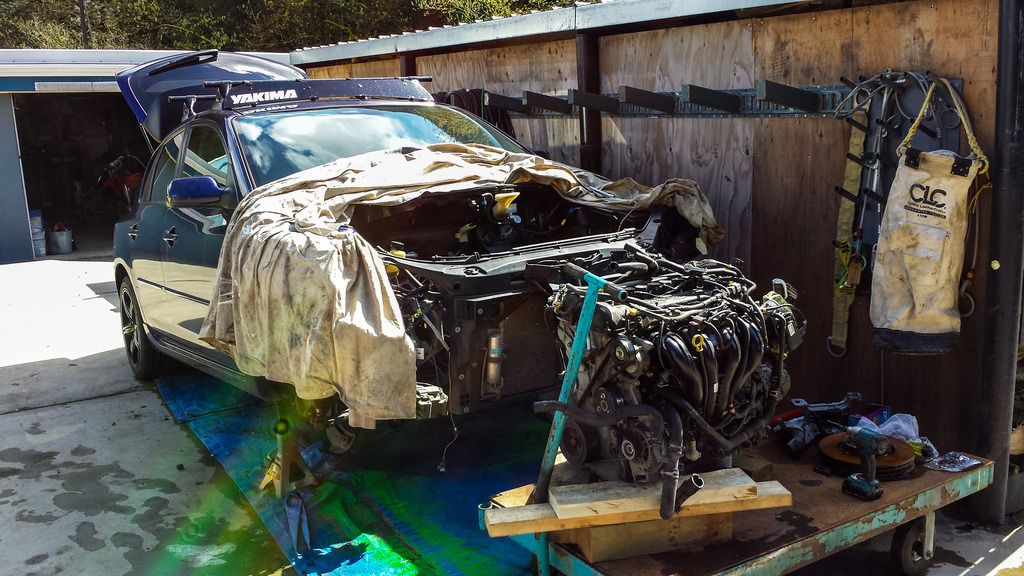
- Gently pull the engine wiring harness away from your 2.3 and set it aside for your 2.5
Step 2: Disassembly of the 2.5L
- Degrease and clean the longblock
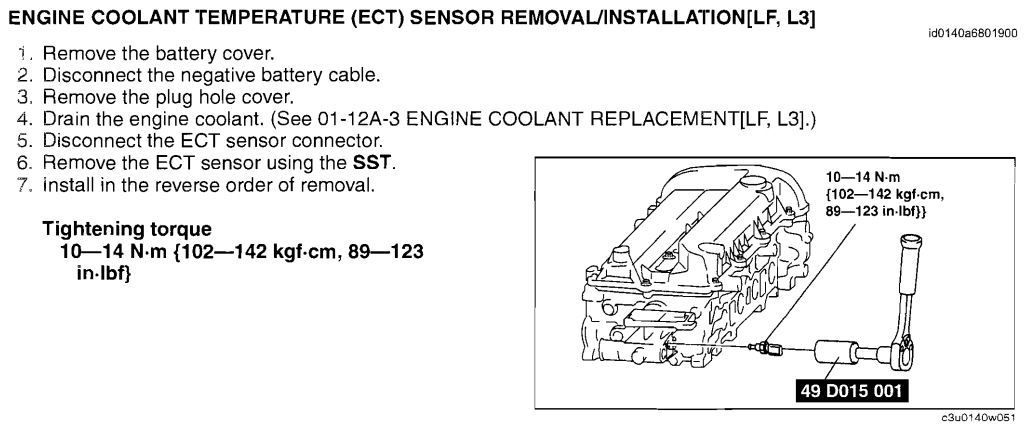
- Remove all sensors (camshaft/crankshaft/oil pressure sender/coolant temp, ect.)
- Remove all accessories (belts, alternator, water pump, tensioner, coil packs, ect.)
- Remove Valve cover
- Remove water distribution block
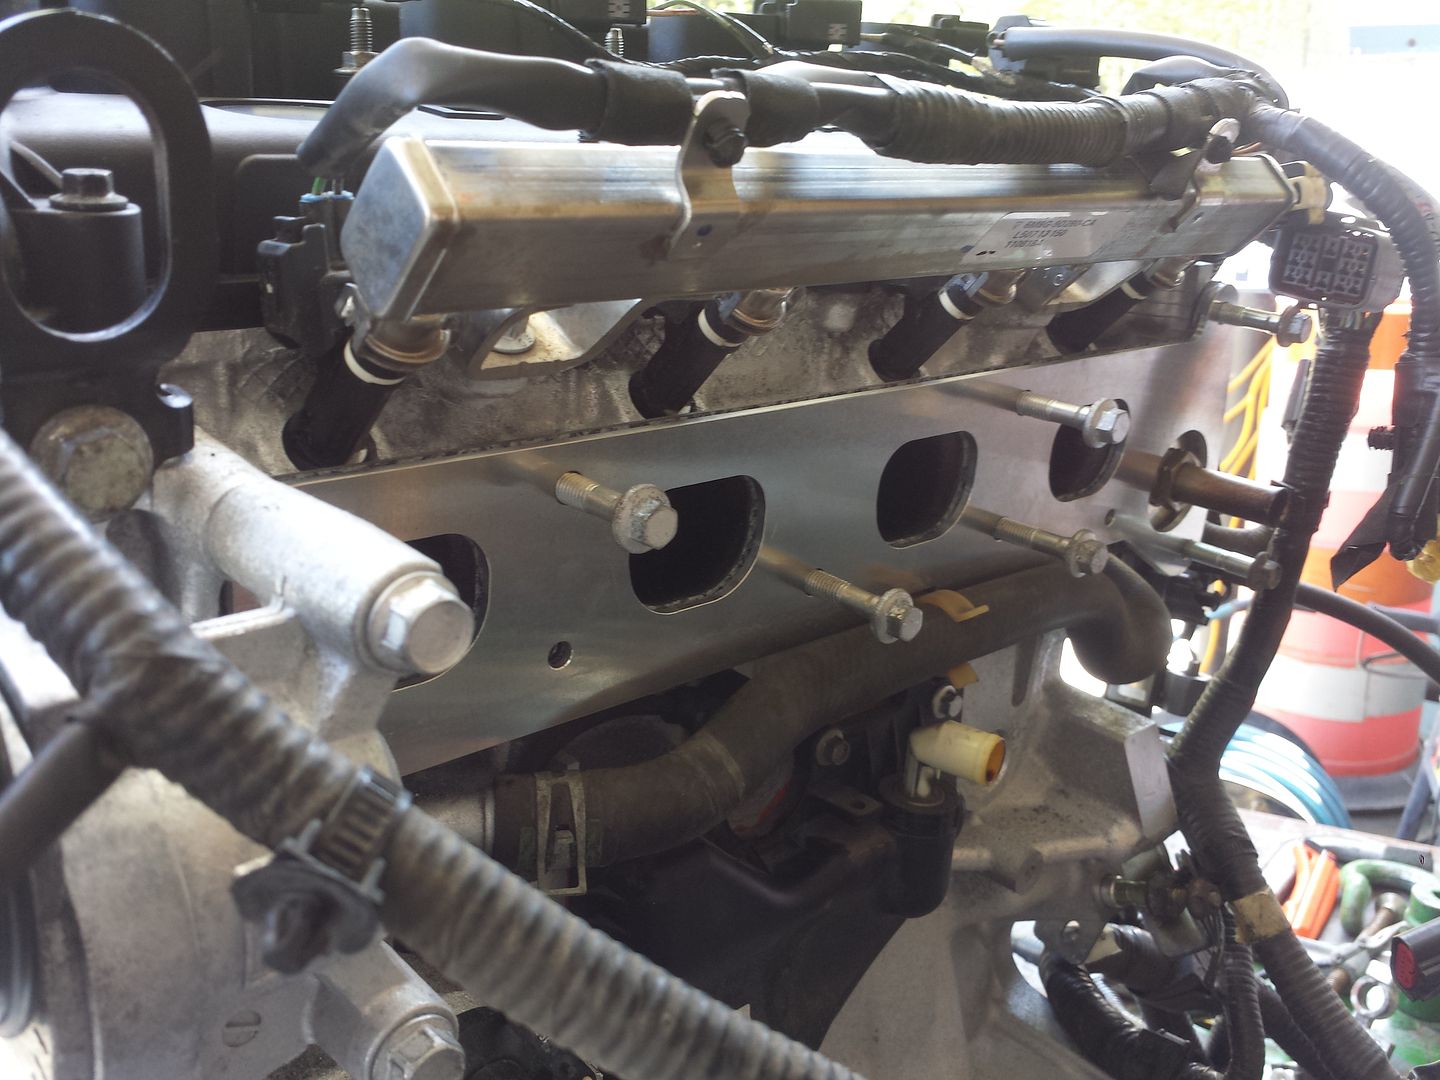
- Remove Intake manifold
- Remove/Inspect spark plugs (set aside to reuse if wanted)
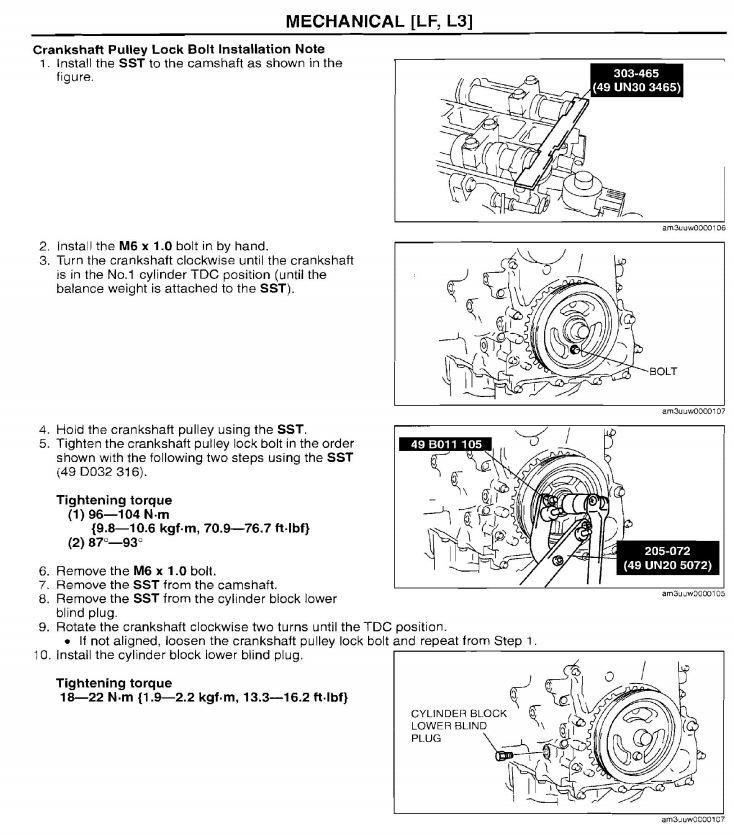
- Turn engine to TDC
1. M6 bolt should thread through the eye hole on the crank pulley into the timing cover
2. On the left side of the engine there will be a blind plug bolt, remove that and install timing bolt (end of the bolt will rest against the side of the crankshaft)
3. should see the top of the piston on #1 Cylinder
4. Install camshaft plate timing tool into back of camshafts (it will only fit in one way)
- Brace the crankshaft temporarily while you remove the flexplate/flywheel
- Brace the crankshaft
- Remove Crank pulley
-04/05 Instructions-
- Remove timing cover
- Loosen Intake Camshaft Sprocket Nut
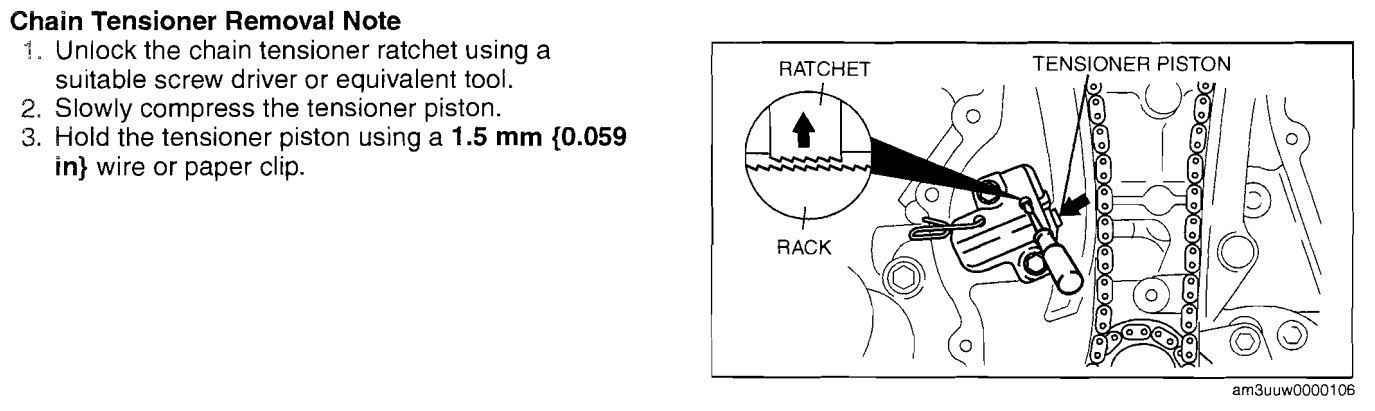
- Remove Chain tensioner and left hand tensioner arm, set aside
- Remove Timing Chain, set aside
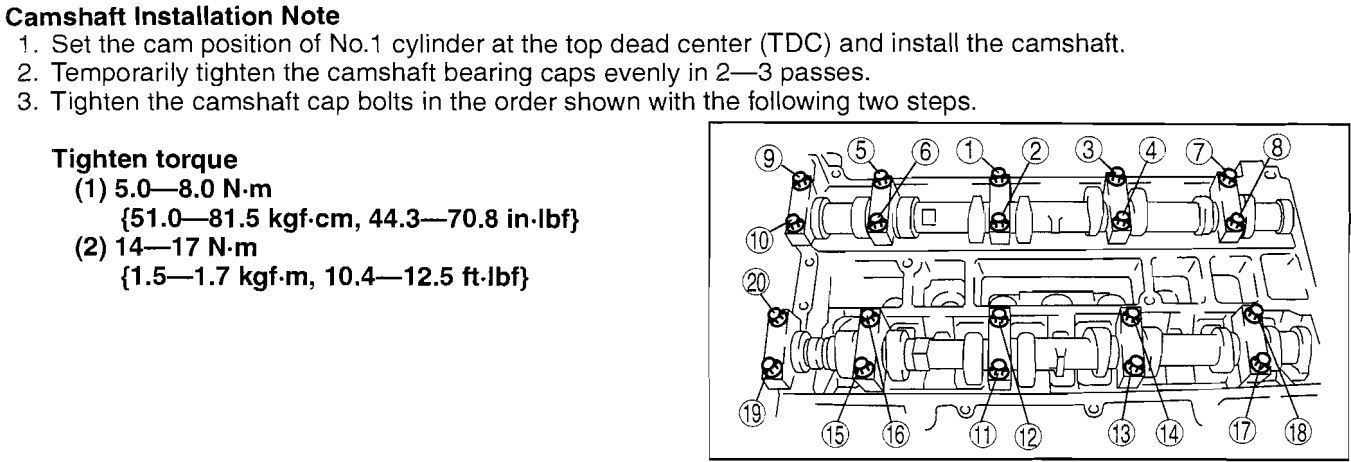
- Remove 10 Intake Camshaft Bolts, and their caps and set aside in order, along with the Oil Control Valve
- Mark position of both 2.3/2.5 Sprocket locations

- Remove Intake camshaft and remove sprocket, set aside (keep the SST in place as best as possible so the exhaust camshaft doesn't move on you)
- Follow the same procedure (less timing/bracing crankshaft) to remove your 2.3 Intake camshaft
- Remove 2.3 Intake sprocket and replace it with your 2.5 Intake sprocket (hand tighten bolt and align the sprocket to your marks and replace the washer)
- Reinstall 2.3 camshaft at TDC position
*slide back into camshaft SST
*front two lobes on both camshafts should be pointing in each other's general direction
Reinstall camshaft caps/bolts/oil control valve
- Re-check camshaft SST for alignment on both camshafts. Be sure the cam notches are running parallel to the SST!
run timing chain over both sprockets and make sure its tight, and turn the intake camshaft in minor +/- increments for the chain to fall in place. There should be no slack here!
- get your crescent wrench and hold it onto the hex park of the camshaft and keep it from moving as best as possible. then tighten the camshaft sprocket bolt to spec *blue threadlocker*
- Reinstall Tensioner/Tensioner Arm
- Run timing chain back over both tensioner arms and back onto crank sprocket
- Release tension on tensioner
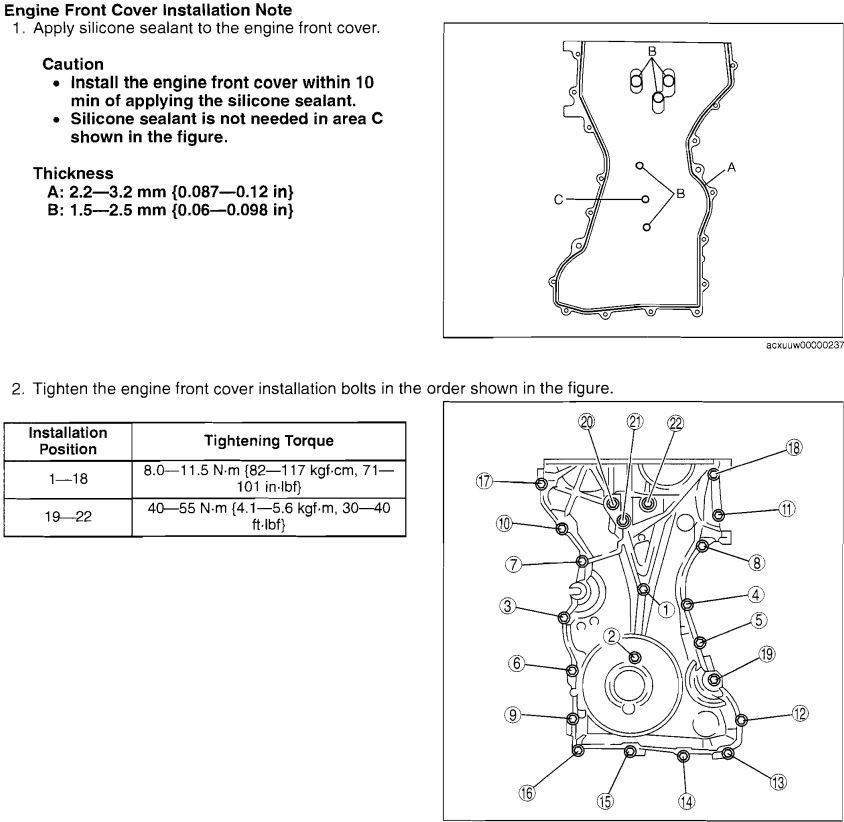
- Re-use your 2.3 timing cover w/ fresh sealant
- Torque to spec:
- End of 04/05 Instructions -
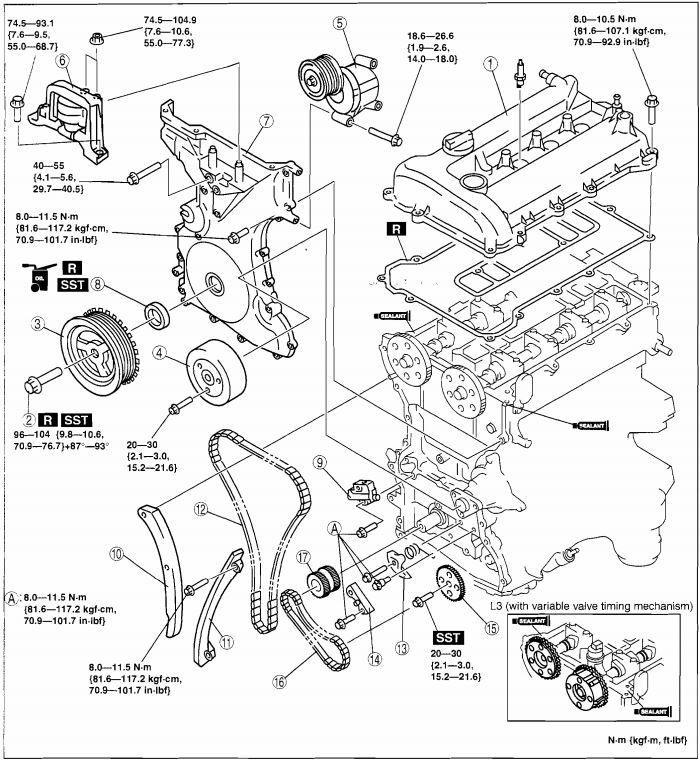
- Replace front oil seal
Install 2.3 Crank Pulley w/ new Crank bolt (and the m6 bolt into timing cover) *Blue threadlocker*
- Torque crank bolt (with your crankshaft still braced) to 76ft-lbs, wait a minute, then tighten an additional 90 degrees
- Remove SSTs (blind plug on the side, camshafts, m6 pulley bolt)
- Remove Crankshaft brace
- Manually rotate the engine 2/4/6 times to double-check timing (crank pulley m6 bolt lines up, camshafts are still running parallel where thee SST was, lobes are pointing at each others general direction, piston at TDC)
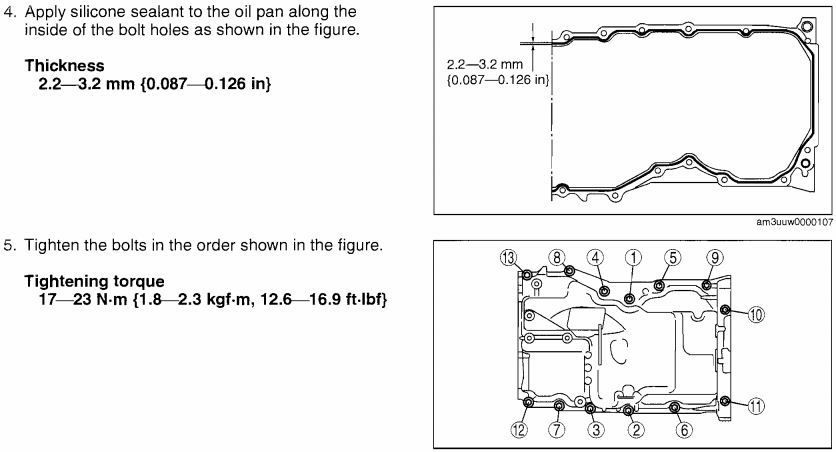
- Flip engine over and remove oil pan, oil pickup tube from the 2.5 and replace with your 2.3 pan and pickup tube
*This would be an excellent time to install your Balance Shaft Delete*
scrape off old gasket material and layer on a new layer, torque to spec
- Install Spark Plugs
- Install Valve cover
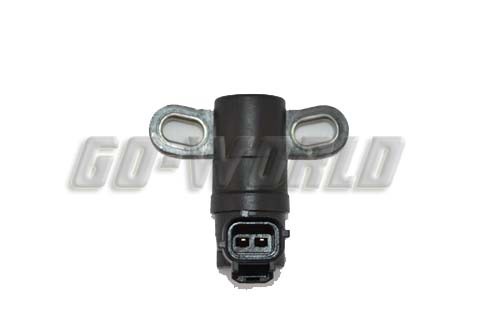
- Install 2.3 camshaft sensor
- Install Coil Packs
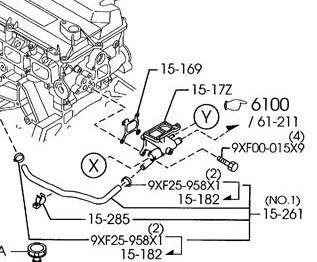
- Replace 2.5 oil pressure sender by oil filter with your 2.3 sender
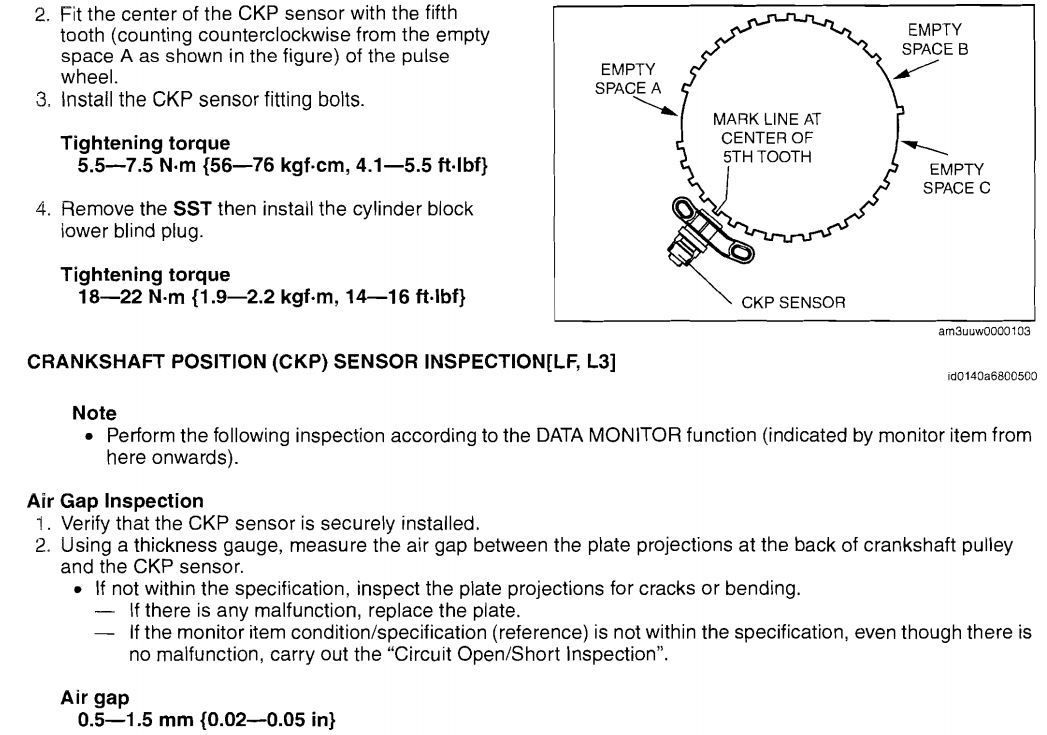
- Install 2.3 Crank sensor
With the engine at tdc. You position the middle of the face of the crank sensor to the middle of the 5th tooth to the left of the first empty space on the pulse wheel
- Install 2.3 tensioner and water pump pulley (04/05 only)
- Install 2.3 tensioner (06+)
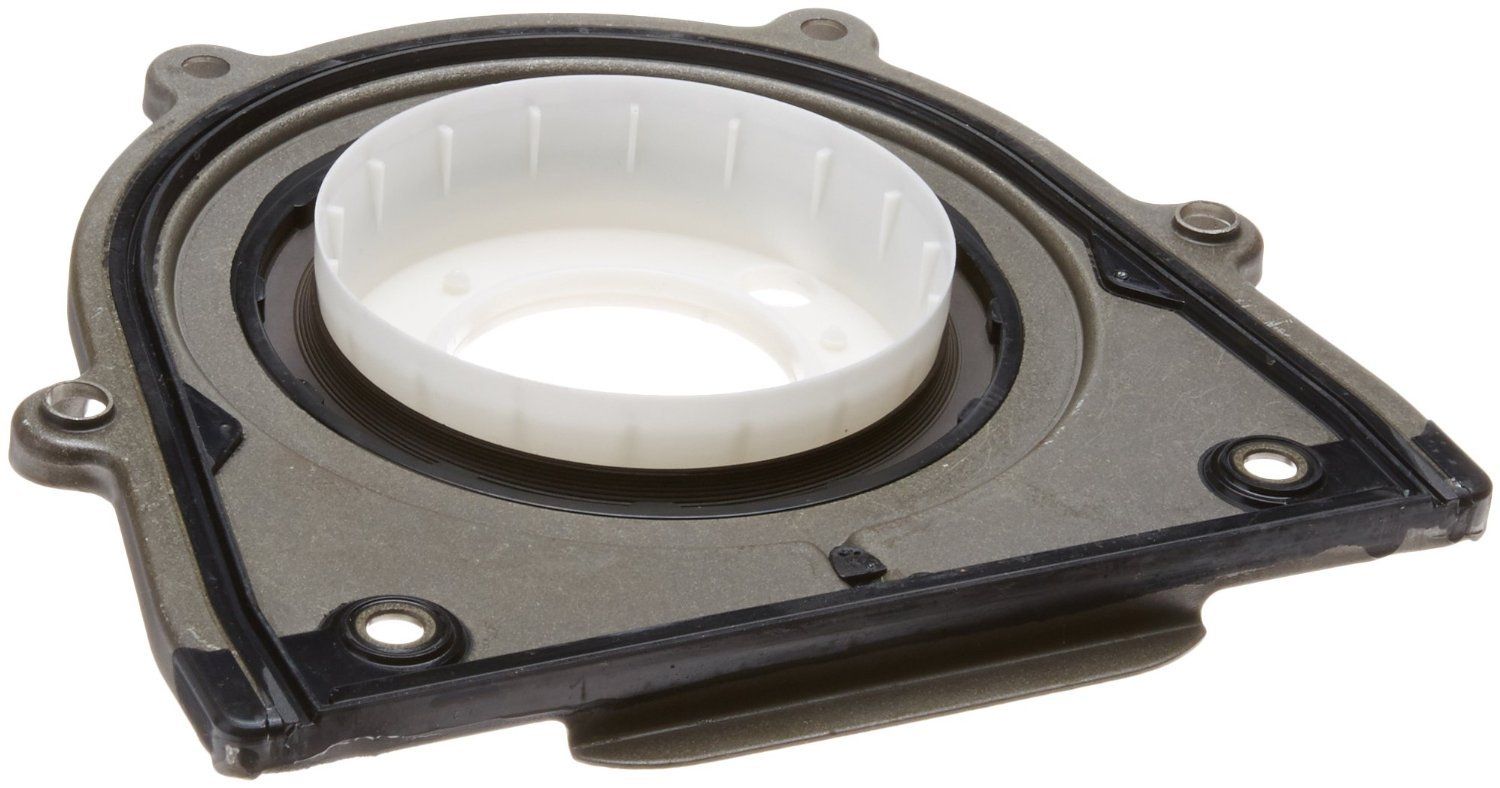
- Install New rear main seal *blue threadlocker on seal bolts*
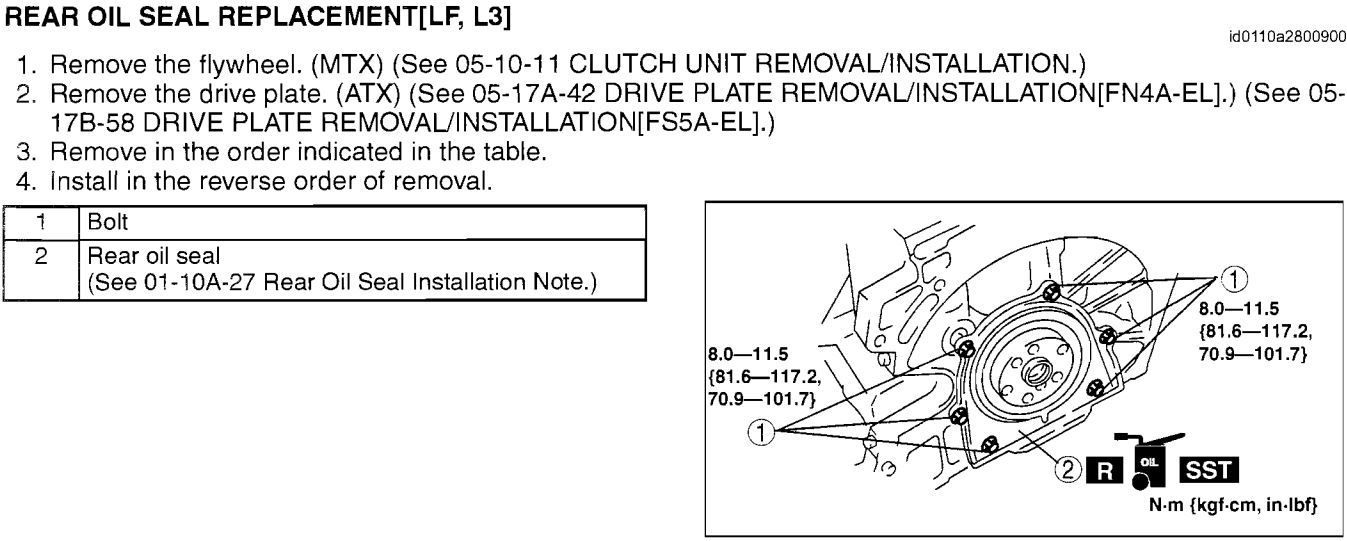
This is the sleeve (SST). Basically you align it with the crank. the tool slides onto the crank, and you slide the seal towards the block, it will slip onto the crank surface as you pull the sleeve away. Just remember, after you're all said and done, the lip of the seal should be pointing TOWARDS the engine.
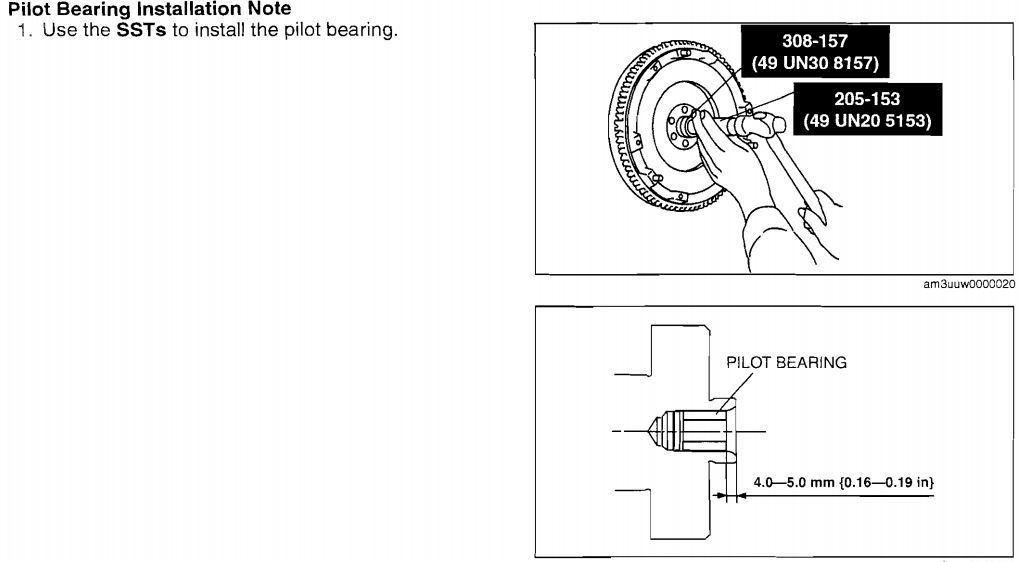
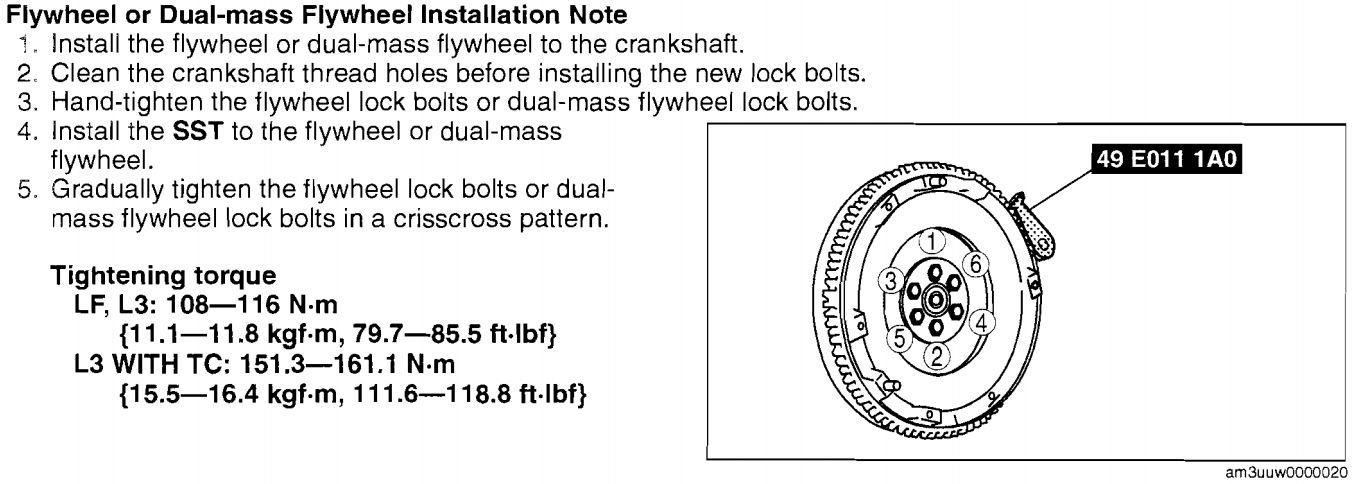
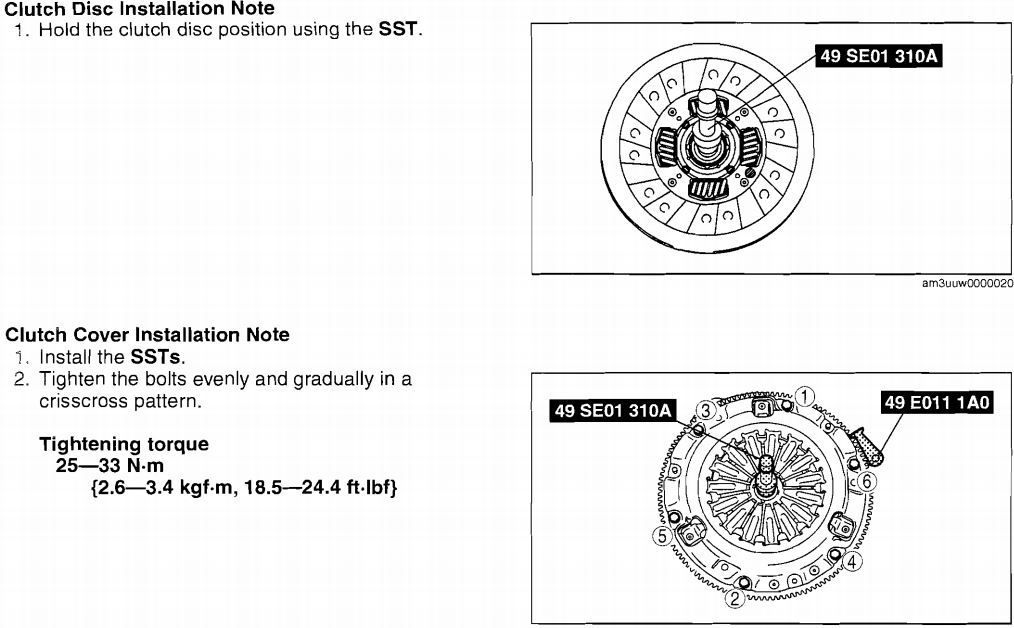
- Install Pilot Bearing/Flywheel/Clutch/Clutch Cover *blue threadlocker should be used here*
- Install throwout Bearing on transmission
- Install alternator
- Install Starter
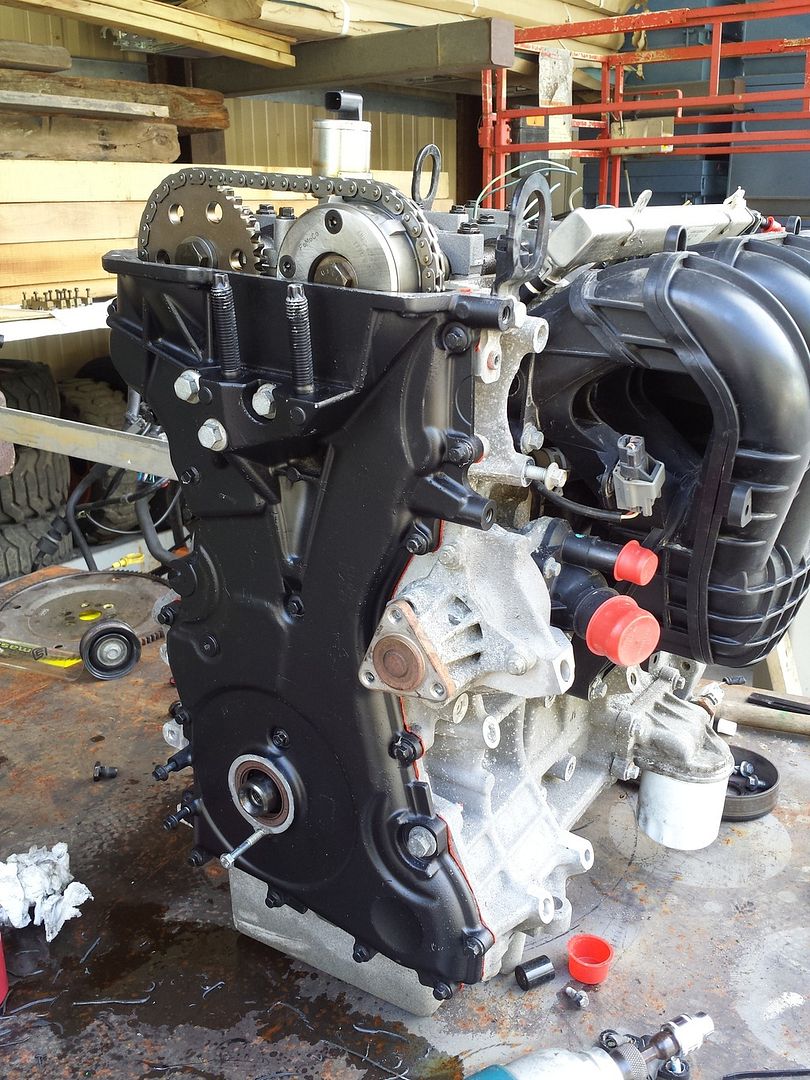
- Install 2.3 water neck
*This would be a good time to run a grounding kit around the engine as well as running lines for an oil catch can*
(HOW-TO: Installing an Oil Catch Can - Mazda3 Forums : The #1 Mazda 3 Forum)
- Install 2.5>2.3 Intake adaptor from 2008Milan
- Install Intake/Throttle Body
*This would be a good time to install your EGR Delete and do the VICS Delete*
(The new improved VTCS removal Guide - Mazda3 Forums : The #1 Mazda 3 Forum)
- Install 2.3 Water distribution outlet block *be sure use your gasket maker here*

- Start reinstalling your 2.3 engine wiring harness back onto your engine. I started from the crank sensor and worked my way around. Be sure to scrape up those grounds to ensure a good connection!
- Install transmission back onto engine
- Install the majority of the coolant lines back onto the engine
- Double check all your connections/grounds/harnesses!
Install Engine/Transmission Procedure:
- Drop engine into general place
- Install Rear Motor Mount
- Install Passenger Motor Mount
- Install Driver Side Motor Mount
- Install exhaust manifold
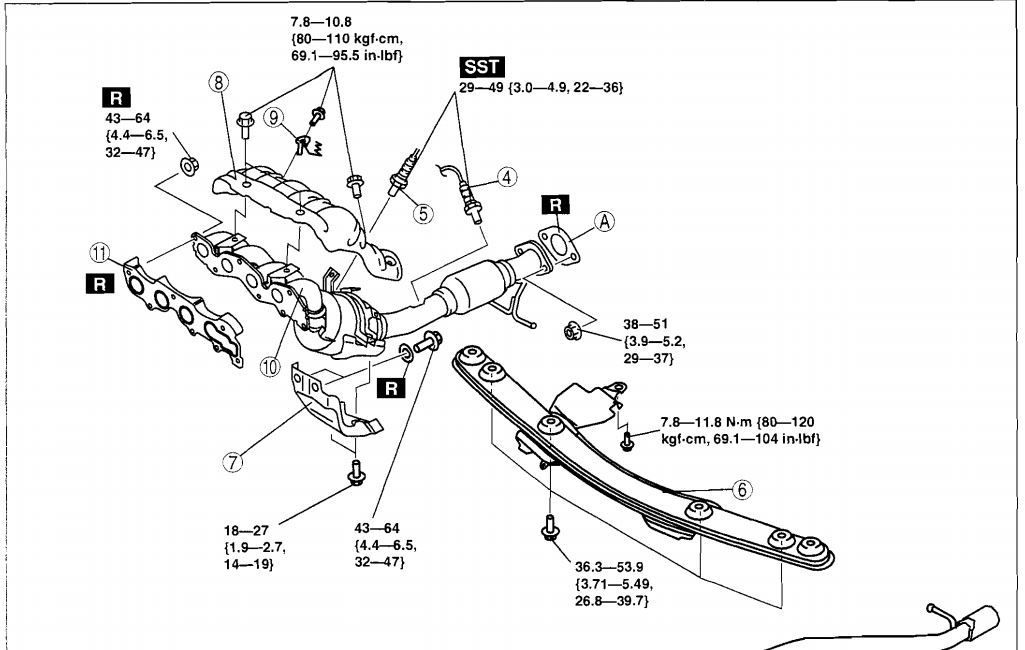
- Hook up 2 O2 sensor plugs
- Hook up grounding cable from passenger side frame to 02 sensor bracket
- Disconnect engine from hoist and move out of the way
- Fill engine with oil
*Pour a Small amount, check for leaks, pour some more, check - - again, ect.
- Fill Transmission with oil
- Install clutch slave cylinder onto transmission
- Install shifter linkage
- Re-Bleed clutch
- Re-Check your connections around the starter/transmission
- Finish running your coolant lines
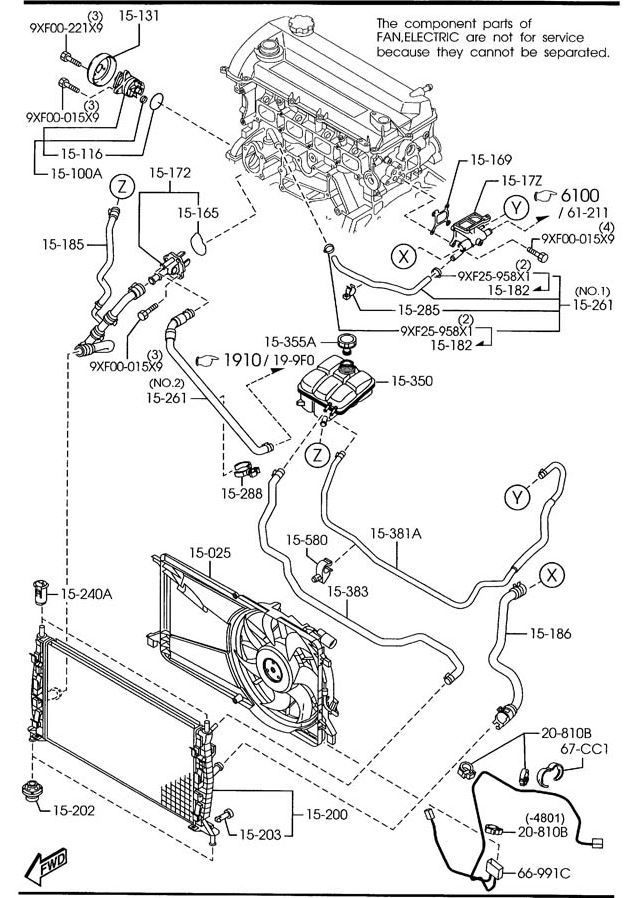
- Fill engine with coolant *Same procedure as engine oil
- Reinstall your fuel/vacuum/Valve cover lines
- Install battery box/ECU back into its place
- Install 3 harnesses back into their places, 2 on the ECU, 1 on the fuse box
- Install Intake w/ MAF and IAT Sensor
1st Start Procedure
*I chose not to hook up my drivelines to the engine in the event of needing to pull the engine back out*
- Pull connections to coil packs
- Turn key to on position and let fuel injectors prime themselves
crank engine at least 10 times to properly lubricate the engine with oil
- Let engine sit for a 5 minutes
- Reinstall coil pack harnesses
- cross your fingers and turn her over!
- Finally, With the engine running keep an eye on any leaks
Watch your coolant level as passage ways are filled with water
- If all is well, reinstall your drivelines AC Compressor, and button her back up!
I hope this thread has helped you. Let me know if there are any discrepancies with it.
- Chris
(PS) Any questions may have already been asked/answered on (http://www.mazda3forums.com/61-powertrain-2004-2009-mazda3/647562-04-2-3l-swap-2-5l-successful.html)
Links:
Mazda3 Workshop Manual
How-To: Mazda/Ford 2.5L Swap
How-To: Mazdaspeed3 Rear Spoiler Install on MZ3 Hatch
How-To: Mazdaspeed3 Transmission Swap
How-To: Mazdaspeed3 Front Sway Bar Install
How-To: Installing an Oil Catch Can
How-To: VICS Removal Guide
How-To: Balance Shaft Delete
I chose to do the 2.5 swap mainly because of the price differences, and the work involved with something other than a direct swap with a 1st gen Mazda 2.3L. This list includes $175 based on LKQ's (eBay) shipping rate.
Mazda 2.3 (04/05)(06-09) - $1375 on average
Ford 2.3 - $725 on average
Mazda 2.5 - $765 on average
Ford 2.5 - $535 on average
So taking that into consideration here is my part breakdown and purchase list. Some of it might not be needed for some of you. I went into this with a do it right the first time mindset.
Engine:
2010 Ford Escape 2.5 w/27k - LKQ (eBay) - $542.98 w/ Shipping
Tuning:
OrangeVirus Tuning Method:
Tactrix Openport 2.0 OBDII Dongle - $171.32
MazdaEdit - $175
OrangeVirus' rate for a custom tune - $99
Parts:
Mazda Clutch Pilot Bearing (YF09-11-303) - $8.91
Mazda Crankshaft Pulley Bolt (LF01-11-406) - $12.44
Mazda Camshaft Washer (LF941242Y) - $9.89
Mazda Timing Cover Seal - (1F2010602) - $10.00
Victor Reinz Main Bearing Gasket (67756) - $33.63
Massive Absolute Precision Cam Timing Tool Set - $29.17
VS50639R1 - Valve Cover Gasket - $14.96
MS97160 - Intake Manifold Gasket - $16.82
MS96901 - Exhaust Manifold Gasket - $16.63
2008Milan 2.5>2.3 Intake Plate - $100
(2.3 to 2.5 engine swap - intake adapter plate - FordFusionClub.com : The #1 Ford Fusion Forum)
31540 - Exhaust Pipe Flange Gasket - $1.60
51516 - Wix Over-sized Oil Filter - $6.91
Castrol 5W-20 Synthetic Oil (5 Quart) - $28.68
Mobil 1 75W-90 Synthetic Transmission Gear Oil (1 Quartx3) - $35.37
Prestone AF2000 Extended Life Antifreeze (Concentrated) - $12.47
Permatex 81160 Hi-Temp Red Gasket Maker - $6.99
Permatex 24200 Blue Thread locker - $4.77
Other (Extras):
EBay Oil Catch Can - $15
GPWerks Balance Shaft Delete Kit - $27.50
Massive RaceSpec EGR Delete System - $31.15
Replacement 3/8 Fuel/Valve Cover Lines - $13.28
DIY Grounding Kit:
8 Gauge Grounding Wire (20ft) - $7.80
8 Gauge Distribution Block - $7.49
8 Gauge Ring Connectors (20) - $8.45
Tan Header Wrap 1/16"X2"X25' - $15.00
BAHNHOF Clutch Kit (EBay) - $87.95
Bahnhof Clutch Disc Bearing Tool Mazda 3 5 Models 2 3L 2 0L | eBay
* Clutch Disc Stage 1
* Bahnhof Release Bearing
* Pilot Bushing
* Alignment Tool
Final Price - $1312.33
Required tools:
Air tools (not needed but highly recommended)
Metric socket set
Metric wrench set
Assortment of socket extensions and adapters
Assortment of Pliers/Cutters/Ect.
Assortment of 1,2,3 Phillips/Robertson/Flathead Screwdrivers
Hammers
(2) Pickle Forks
Prybars and Breaker bars
Engine Hoist
Engine Stand
Torque Wrench
Links:
Mazda3 Workshop Manual
How-To: Mazda/Ford 2.5L Swap
How-To: Mazdaspeed3 Rear Spoiler Install on MZ3 Hatch
How-To: Mazdaspeed3 Transmission Swap
How-To: Mazdaspeed3 Front Sway Bar Install
How-To: Installing an Oil Catch Can
How-To: VICS Removal Guide
How-To: Balance Shaft Delete
*Use my How To in conjunction with the Mazda Workshop Manual and (http://www.mazda3forums.com/61-powertrain-2004-2009-mazda3/647562-04-2-3l-swap-2-5l-successful.html). You should not run into any issues!
This may also be an excellent time to do any suspension maintenance or installs of beefier sway bars.
Step 1: Removal
- Remove your old engine, here's a link to a 6 getting its engine pulled: Mazda 6 and Ford Fusion 2.3L Engine Swap | Happy Wrenching
- Remove your hood
- Remove your engine cover
- Disconnect the 2 harnesses located on the ECU, and the one inside of your fuse box
- Remove battery and its cover
- Remove intake all the way down to the collector below the frame line
you should now have something like this:

- Jack your car up
- Remove your wheels
- Remove all your splash guards (2 fender walls and then the front splash guard)
- Drain your Oil and Transmission fluid
- Remove your axle nuts
- Remove your breaks and zap-strap them to your spring
- Separate both your lower control arm and steering link with 2 pickle forks
- Free your CV shafts from your wheel hub (just pull the hub towards you and the CV shaft should pop free
- Remove your CV Shafts from the transaxle
* Passenger side has a bracket mounted to the engine, 3 bolts to remove here
* Give them a good yank as close to the transmission as possible, the drivers side needed a little more coaxing with a small prybar and wiggle room
- Have a way of containing the differential after you pull the CV Shafts out, or it might slip. I used 2 same sized sockets as placeholders
- Remove your exhaust manifold
* Here I removed the 2 bolts after the 2nd o2 sensor first. They broke on me due to the rust, cut off the stud, and drill them out, and then find yourself some nice stainless hardware so you never have this problem again once it's time for an aftermarket header or catback.
* Move your way on up and disconnect the 2 o2 sensor pigtails on the engine side and let them hang
* Remove the first mounting bracket close to the first catalytic converter
* Remove the hardware holding the manifold to the block
* With the manifold removed from the rest of the exhaust system I was able to push the header as far down to the firewall/cross-member to avoid any conflict with the engine removal process.
- Drain all your coolant and remove coolant lines connected to engine
- Remove your front bumper cover
- Remove your Headlights
- Remove your front crash bar
- Disconnect your fuel line and vacuum line to the master cylinder. Both connections I removed at the firewall.
- Disconnect your clutch slave cylinder and move out of the way
Remove your shifter linkage from the transmission
- Rig up your means of removing the engine
- I unbolted one bolt from the rad support beam just above where the headlight was and that gave me a lot of room for the pull
With the engine supported by the hoist, remove all 3 engine mounts
- Remove your engine slowly, and check for any snags

- Gently pull the engine wiring harness away from your 2.3 and set it aside for your 2.5
Step 2: Disassembly of the 2.5L
- Degrease and clean the longblock
- Remove all sensors (camshaft/crankshaft/oil pressure sender/coolant temp, ect.)
- Remove all accessories (belts, alternator, water pump, tensioner, coil packs, ect.)
- Remove Valve cover
- Remove water distribution block
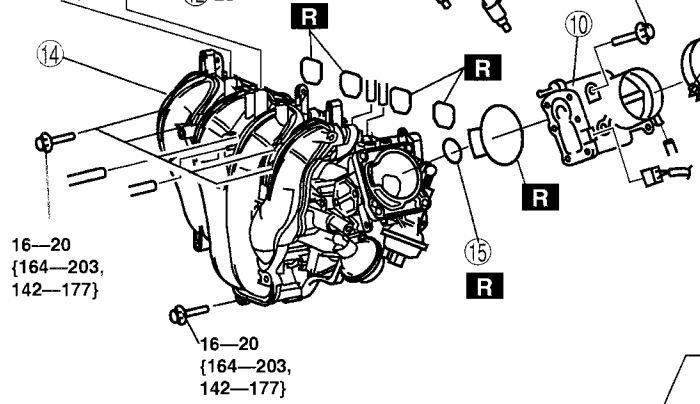
- Remove Intake manifold
- Remove/Inspect spark plugs (set aside to reuse if wanted)
- Turn engine to TDC
1. M6 bolt should thread through the eye hole on the crank pulley into the timing cover
2. On the left side of the engine there will be a blind plug bolt, remove that and install timing bolt (end of the bolt will rest against the side of the crankshaft)
3. should see the top of the piston on #1 Cylinder
4. Install camshaft plate timing tool into back of camshafts (it will only fit in one way)

- Brace the crankshaft temporarily while you remove the flexplate/flywheel
- Brace the crankshaft

- Remove Crank pulley
-04/05 Instructions-
- Remove timing cover
- Loosen Intake Camshaft Sprocket Nut
- Remove Chain tensioner and left hand tensioner arm, set aside

- Remove Timing Chain, set aside
- Remove 10 Intake Camshaft Bolts, and their caps and set aside in order, along with the Oil Control Valve
- Mark position of both 2.3/2.5 Sprocket locations

- Remove Intake camshaft and remove sprocket, set aside (keep the SST in place as best as possible so the exhaust camshaft doesn't move on you)
- Follow the same procedure (less timing/bracing crankshaft) to remove your 2.3 Intake camshaft
- Remove 2.3 Intake sprocket and replace it with your 2.5 Intake sprocket (hand tighten bolt and align the sprocket to your marks and replace the washer)
- Reinstall 2.3 camshaft at TDC position
*slide back into camshaft SST
*front two lobes on both camshafts should be pointing in each other's general direction
Reinstall camshaft caps/bolts/oil control valve

- Re-check camshaft SST for alignment on both camshafts. Be sure the cam notches are running parallel to the SST!
run timing chain over both sprockets and make sure its tight, and turn the intake camshaft in minor +/- increments for the chain to fall in place. There should be no slack here!

- get your crescent wrench and hold it onto the hex park of the camshaft and keep it from moving as best as possible. then tighten the camshaft sprocket bolt to spec *blue threadlocker*
- Reinstall Tensioner/Tensioner Arm
- Run timing chain back over both tensioner arms and back onto crank sprocket
- Release tension on tensioner
- Re-use your 2.3 timing cover w/ fresh sealant
- Torque to spec:


- End of 04/05 Instructions -
- Replace front oil seal
Install 2.3 Crank Pulley w/ new Crank bolt (and the m6 bolt into timing cover) *Blue threadlocker*
- Torque crank bolt (with your crankshaft still braced) to 76ft-lbs, wait a minute, then tighten an additional 90 degrees
- Remove SSTs (blind plug on the side, camshafts, m6 pulley bolt)
- Remove Crankshaft brace
- Manually rotate the engine 2/4/6 times to double-check timing (crank pulley m6 bolt lines up, camshafts are still running parallel where thee SST was, lobes are pointing at each others general direction, piston at TDC)
- Flip engine over and remove oil pan, oil pickup tube from the 2.5 and replace with your 2.3 pan and pickup tube
*This would be an excellent time to install your Balance Shaft Delete*
scrape off old gasket material and layer on a new layer, torque to spec

- Install Spark Plugs
- Install Valve cover
- Install 2.3 camshaft sensor
- Install Coil Packs
- Replace 2.5 oil pressure sender by oil filter with your 2.3 sender
- Install 2.3 Crank sensor
With the engine at tdc. You position the middle of the face of the crank sensor to the middle of the 5th tooth to the left of the first empty space on the pulse wheel

- Install 2.3 tensioner and water pump pulley (04/05 only)
- Install 2.3 tensioner (06+)
- Install New rear main seal *blue threadlocker on seal bolts*

This is the sleeve (SST). Basically you align it with the crank. the tool slides onto the crank, and you slide the seal towards the block, it will slip onto the crank surface as you pull the sleeve away. Just remember, after you're all said and done, the lip of the seal should be pointing TOWARDS the engine.

- Install Pilot Bearing/Flywheel/Clutch/Clutch Cover *blue threadlocker should be used here*


- Install throwout Bearing on transmission
- Install alternator
- Install Starter
- Install 2.3 water neck
*This would be a good time to run a grounding kit around the engine as well as running lines for an oil catch can*
(HOW-TO: Installing an Oil Catch Can - Mazda3 Forums : The #1 Mazda 3 Forum)
- Install 2.5>2.3 Intake adaptor from 2008Milan

- Install Intake/Throttle Body
*This would be a good time to install your EGR Delete and do the VICS Delete*
(The new improved VTCS removal Guide - Mazda3 Forums : The #1 Mazda 3 Forum)

- Install 2.3 Water distribution outlet block *be sure use your gasket maker here*


- Start reinstalling your 2.3 engine wiring harness back onto your engine. I started from the crank sensor and worked my way around. Be sure to scrape up those grounds to ensure a good connection!
- Install transmission back onto engine
- Install the majority of the coolant lines back onto the engine
- Double check all your connections/grounds/harnesses!
Install Engine/Transmission Procedure:
- Drop engine into general place
- Install Rear Motor Mount
- Install Passenger Motor Mount
- Install Driver Side Motor Mount
- Install exhaust manifold

- Hook up 2 O2 sensor plugs
- Hook up grounding cable from passenger side frame to 02 sensor bracket
- Disconnect engine from hoist and move out of the way
- Fill engine with oil
*Pour a Small amount, check for leaks, pour some more, check - - again, ect.
- Fill Transmission with oil
- Install clutch slave cylinder onto transmission
- Install shifter linkage
- Re-Bleed clutch
- Re-Check your connections around the starter/transmission
- Finish running your coolant lines

- Fill engine with coolant *Same procedure as engine oil
- Reinstall your fuel/vacuum/Valve cover lines
- Install battery box/ECU back into its place
- Install 3 harnesses back into their places, 2 on the ECU, 1 on the fuse box
- Install Intake w/ MAF and IAT Sensor
1st Start Procedure
*I chose not to hook up my drivelines to the engine in the event of needing to pull the engine back out*
- Pull connections to coil packs
- Turn key to on position and let fuel injectors prime themselves
crank engine at least 10 times to properly lubricate the engine with oil
- Let engine sit for a 5 minutes
- Reinstall coil pack harnesses
- cross your fingers and turn her over!
- Finally, With the engine running keep an eye on any leaks
Watch your coolant level as passage ways are filled with water
- If all is well, reinstall your drivelines AC Compressor, and button her back up!

I hope this thread has helped you. Let me know if there are any discrepancies with it.
- Chris
(PS) Any questions may have already been asked/answered on (http://www.mazda3forums.com/61-powertrain-2004-2009-mazda3/647562-04-2-3l-swap-2-5l-successful.html)
Links:
Mazda3 Workshop Manual
How-To: Mazda/Ford 2.5L Swap
How-To: Mazdaspeed3 Rear Spoiler Install on MZ3 Hatch
How-To: Mazdaspeed3 Transmission Swap
How-To: Mazdaspeed3 Front Sway Bar Install
How-To: Installing an Oil Catch Can
How-To: VICS Removal Guide
How-To: Balance Shaft Delete