
Here's some DIY information on checking and/or changing the blower motor on a 2010-2011 (and likely 2012-2013 although I don't know that for certain). This does not apply, and has no relationship to the first gens (2009 and earlier). This is a long write up with lots of details. Here's a quick summary for you to decide if you want to read on. There are 2 main points that are reviewed below. The first is an evaluation of possibly skipping most of the complex and time-consuming FSM blower removal/install procedure. The second item a discussion of the troublesome 'hidden' blower cage screw, along with a couple of pics of it. So if these are things that matter to you, then read on.
First off I'll mention that this came about when my Daughter's 3i blower motor became fairly loud. The noise it was making sounded to me like perhaps it was unbalanced due to rodent debris in the motor, versus the motor going bad. However, my Daughter lives 2 hours away, so I ordered a new blower just in case the old one was shot. And this turned out to be fortunate for an unplanned reason.
And I also studied the FSM procedure for changing the blower motor, again just in case. For anyone who is not aware of this 'book' procedure, it's basically a nightmare. The FSM specifies a huge amount of things to remove, including the console and driver lower dash panel. The full removal process must take a number of hours, even for an experienced tech.
After quite a bit of careful review, I came to understand that the great majority of this procedure is designed to give access to the blower motor from the driver's side, and a much smaller portion of the removal process gives access to the blower on the passenger side. I also realized that only 3 things need to be done from the driver's side: push a release tab on the blower motor which enables it to turn and move toward the passenger side; remove the blower motor electrical connector; and remove the cooling tube from the motor. Once those 3 very simple things are done, the blower is removed from the passenger side. The installation of the blower requires those same 3 things to be done in a reverse fashion.
Taking into consideration the very large amount of work involved, I decided to invest a bit of time to explore the possibility of performing those 3 things on the drivers sided without removing anything at all. So I pushed and tilted the driver's seat all the way back, and put a couple of firm pillows on the floor in front of the seat. Then I maneuvered my body laying down on the seat backwards. Doing that let me get my head all the way under the dash, with a good view of the area where the blower motor is located. The first glance up did not look promising at all, with only the blower breather tube visible from my vantage point. But I didn't want to just give up without a decent effort, so I began poking around with my left hand up into the blower area, using the tube as a starting point. Low and behold, I was able to actually locate and identify the key parts of the back of the blower motor using the fingers of my left hand, even though I was not able to actually see them. This is strictly a left hand-only procedure.
One thing that was an absolute must have to accomplish all of this identification was the new blower motor. I was able to feel my way around the back side of the blower, moving my fingers from one place to another, using the prominent features of the new unit as a guide. And most surprisingly of all, I was able to perform the 3 things necessary to free the blower from the driver side section of the blower case. I was able to push the release tab and begin to turn the motor, free the electrical connector from the motor, and also remove the tube (the round part instead of the oblong end connected to the motor itself). Although I didn't actually (need to} remove the motor, I went far enough to prove to myself that it can be done, before returning all 3 items to their 'installed' positions.
I also need to add to the above that I'm not a big guy (5'8" 150lbs) and, most importantly, have probably a slightly less-than-average size hand. Everything that I described above is likely to be quite a bit more difficult for a larger person, and especially for anyone having a large, meaty hand. The available free space for fingers of the left hand to move around in is extremely limited, and a large hand might make doing what I've described very difficult. Removing the drivers seat would undoubtedly make the working conditions for this effort much more comfortable. I didn't need to pull the seat out myself, but can imagine that others might find that step to be necessary to be able to accomplish what I've described above.
So if you're faced with performing the FSM procedure in order to remove your blower motor, I believe it's worth investing a bit of time and see if you can get to the back of the blower motor as I was able to do. You might just save yourself many hours of tedious work.
And now for the second topic of this write up, which is not directly related to the previous discussion. This item has to do with the blower motor area on the passenger side, which is the side where the unit is actually removed and reinstalled. There are actually very few 'things' that need to be removed, in order to access the blower motor on the passenger side. Just a few simple pieces of pop-out trim, the glove box, and the blower motor cage, and all are very simple with the exception of the last item.
The FSM simply says to remove the 3 screws holding the blower motor cage in place. All well and good for the 2 of them that are in plain sight. The third one - not so much. This screw is hidden from sight, and can be a nightmare if you don't know how to locate it for removal, and also how to deal with it well on the reinstall.
A picture is often worth a thousand words, and that's the case here. In the first 2 pics below, I'm showing the actual location of that third screw, along with the technique I used to remove and reinstall it. Although a regular long screw or bit driver might work, I found it easier to use a section of 1/4" extension, along with a Phillips bit. Although I used that bit to remove the screw, I actually switched to a 7mm socket for the installation (after the pics were taken). I have no doubt that the socked is much better on the install, because the head of the screw can be tucked into the socket, which allows the extension to be taped to the body of cage, giving a very solid unit (the screw gets started/imbedded into the plastic of the cage, which keeps that end in place). Taping the socket/extension to the cage gives the happy result of no fumbling around to 'find' the screw head on the install. Just snap a ratchet into the extension and torque the screw in. The fumbling abound does still take place on the removal of that screw, but not so much if you know in advance exactly where it's located. And in addition to the hidden screw, the removal and (especially) the reinstall of the blower cage is tedious, particularly for a first-timer. It's a very tight fit, so just go slow and easy with it, never force anything, and make sure that no wires or connectors are damaged by the movement of the cage out and back in.
That's just about it, except for one last pic, which is the pile of rodent nesting that had become impacted into mainly one side of the fan. The new (unused) fan is there for size comparison. It's certainly easy to understand how a mess like that could unbalance the motor, and cause it to make some loud, unhappy noise. So a note to myself (and anyone else who doesn't live in a city) is to clean out the cabin filters frequently. That's a very easy job, and is likely to reduce the chances of a blower motor getting trashed out like ours did.
Hopefully all of this information will help others in the future who decide to take on this challenging job.
First off I'll mention that this came about when my Daughter's 3i blower motor became fairly loud. The noise it was making sounded to me like perhaps it was unbalanced due to rodent debris in the motor, versus the motor going bad. However, my Daughter lives 2 hours away, so I ordered a new blower just in case the old one was shot. And this turned out to be fortunate for an unplanned reason.
And I also studied the FSM procedure for changing the blower motor, again just in case. For anyone who is not aware of this 'book' procedure, it's basically a nightmare. The FSM specifies a huge amount of things to remove, including the console and driver lower dash panel. The full removal process must take a number of hours, even for an experienced tech.
After quite a bit of careful review, I came to understand that the great majority of this procedure is designed to give access to the blower motor from the driver's side, and a much smaller portion of the removal process gives access to the blower on the passenger side. I also realized that only 3 things need to be done from the driver's side: push a release tab on the blower motor which enables it to turn and move toward the passenger side; remove the blower motor electrical connector; and remove the cooling tube from the motor. Once those 3 very simple things are done, the blower is removed from the passenger side. The installation of the blower requires those same 3 things to be done in a reverse fashion.
Taking into consideration the very large amount of work involved, I decided to invest a bit of time to explore the possibility of performing those 3 things on the drivers sided without removing anything at all. So I pushed and tilted the driver's seat all the way back, and put a couple of firm pillows on the floor in front of the seat. Then I maneuvered my body laying down on the seat backwards. Doing that let me get my head all the way under the dash, with a good view of the area where the blower motor is located. The first glance up did not look promising at all, with only the blower breather tube visible from my vantage point. But I didn't want to just give up without a decent effort, so I began poking around with my left hand up into the blower area, using the tube as a starting point. Low and behold, I was able to actually locate and identify the key parts of the back of the blower motor using the fingers of my left hand, even though I was not able to actually see them. This is strictly a left hand-only procedure.
One thing that was an absolute must have to accomplish all of this identification was the new blower motor. I was able to feel my way around the back side of the blower, moving my fingers from one place to another, using the prominent features of the new unit as a guide. And most surprisingly of all, I was able to perform the 3 things necessary to free the blower from the driver side section of the blower case. I was able to push the release tab and begin to turn the motor, free the electrical connector from the motor, and also remove the tube (the round part instead of the oblong end connected to the motor itself). Although I didn't actually (need to} remove the motor, I went far enough to prove to myself that it can be done, before returning all 3 items to their 'installed' positions.
I also need to add to the above that I'm not a big guy (5'8" 150lbs) and, most importantly, have probably a slightly less-than-average size hand. Everything that I described above is likely to be quite a bit more difficult for a larger person, and especially for anyone having a large, meaty hand. The available free space for fingers of the left hand to move around in is extremely limited, and a large hand might make doing what I've described very difficult. Removing the drivers seat would undoubtedly make the working conditions for this effort much more comfortable. I didn't need to pull the seat out myself, but can imagine that others might find that step to be necessary to be able to accomplish what I've described above.
So if you're faced with performing the FSM procedure in order to remove your blower motor, I believe it's worth investing a bit of time and see if you can get to the back of the blower motor as I was able to do. You might just save yourself many hours of tedious work.
And now for the second topic of this write up, which is not directly related to the previous discussion. This item has to do with the blower motor area on the passenger side, which is the side where the unit is actually removed and reinstalled. There are actually very few 'things' that need to be removed, in order to access the blower motor on the passenger side. Just a few simple pieces of pop-out trim, the glove box, and the blower motor cage, and all are very simple with the exception of the last item.
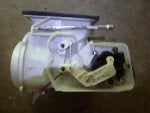
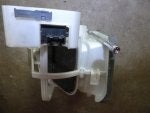
The FSM simply says to remove the 3 screws holding the blower motor cage in place. All well and good for the 2 of them that are in plain sight. The third one - not so much. This screw is hidden from sight, and can be a nightmare if you don't know how to locate it for removal, and also how to deal with it well on the reinstall.
A picture is often worth a thousand words, and that's the case here. In the first 2 pics below, I'm showing the actual location of that third screw, along with the technique I used to remove and reinstall it. Although a regular long screw or bit driver might work, I found it easier to use a section of 1/4" extension, along with a Phillips bit. Although I used that bit to remove the screw, I actually switched to a 7mm socket for the installation (after the pics were taken). I have no doubt that the socked is much better on the install, because the head of the screw can be tucked into the socket, which allows the extension to be taped to the body of cage, giving a very solid unit (the screw gets started/imbedded into the plastic of the cage, which keeps that end in place). Taping the socket/extension to the cage gives the happy result of no fumbling around to 'find' the screw head on the install. Just snap a ratchet into the extension and torque the screw in. The fumbling abound does still take place on the removal of that screw, but not so much if you know in advance exactly where it's located. And in addition to the hidden screw, the removal and (especially) the reinstall of the blower cage is tedious, particularly for a first-timer. It's a very tight fit, so just go slow and easy with it, never force anything, and make sure that no wires or connectors are damaged by the movement of the cage out and back in.
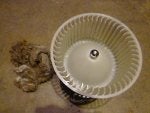
That's just about it, except for one last pic, which is the pile of rodent nesting that had become impacted into mainly one side of the fan. The new (unused) fan is there for size comparison. It's certainly easy to understand how a mess like that could unbalance the motor, and cause it to make some loud, unhappy noise. So a note to myself (and anyone else who doesn't live in a city) is to clean out the cabin filters frequently. That's a very easy job, and is likely to reduce the chances of a blower motor getting trashed out like ours did.
Hopefully all of this information will help others in the future who decide to take on this challenging job.